Monday, August 14, 2023

Memory Forensics R&D Illustrated: Recovering Raw Sockets on Windows 10+

As mentioned in a recent blog post, our team is once again offering in-person training, and we have substantially updated our course for this occasion. Our next offering will be in Amsterdam in October 2023. To showcase our team’s new research, we are publishing a series of blog posts to offer a sneak peek at the types of analysis incorporated into the updated Malware & Memory Forensics training course.


In this blog post, we present our recent research effort to modernize Volatility’s ability to detect the usage of raw sockets by malicious applications, which led to the creation of a new Volatility 3 plugin. Before we begin the technical breakdown, we would like to take this moment to officially welcome the newest member of the Volatility core development team, Gus Moreira, who was a key contributor to this research effort. Gus began working with Volatility when he submitted to and won the 2020 Volatility plugin contest and he has since contributed many new plugins, APIs, and bug fixes to Volatility 3. We are very happy to have Gus’s help with moving Volatility 3 forward, and there will be several future blog posts detailing other research efforts in which he was deeply involved.

Raw Sockets Background

Raw sockets allow privileged applications to both read (sniff) incoming network traffic and construct packets from scratch before being sent, including creating the protocol headers. A wide variety of malicious applications have abused these features in order to steal sensitive information as it traverses the network, forge network streams, bypass network intrusion monitors, and implement custom command-and-control protocols.

The following excerpt from The Art of Memory Forensics shows how applications can use the SIO_RCVALL IOCTL to receive all packets that traverse the system:

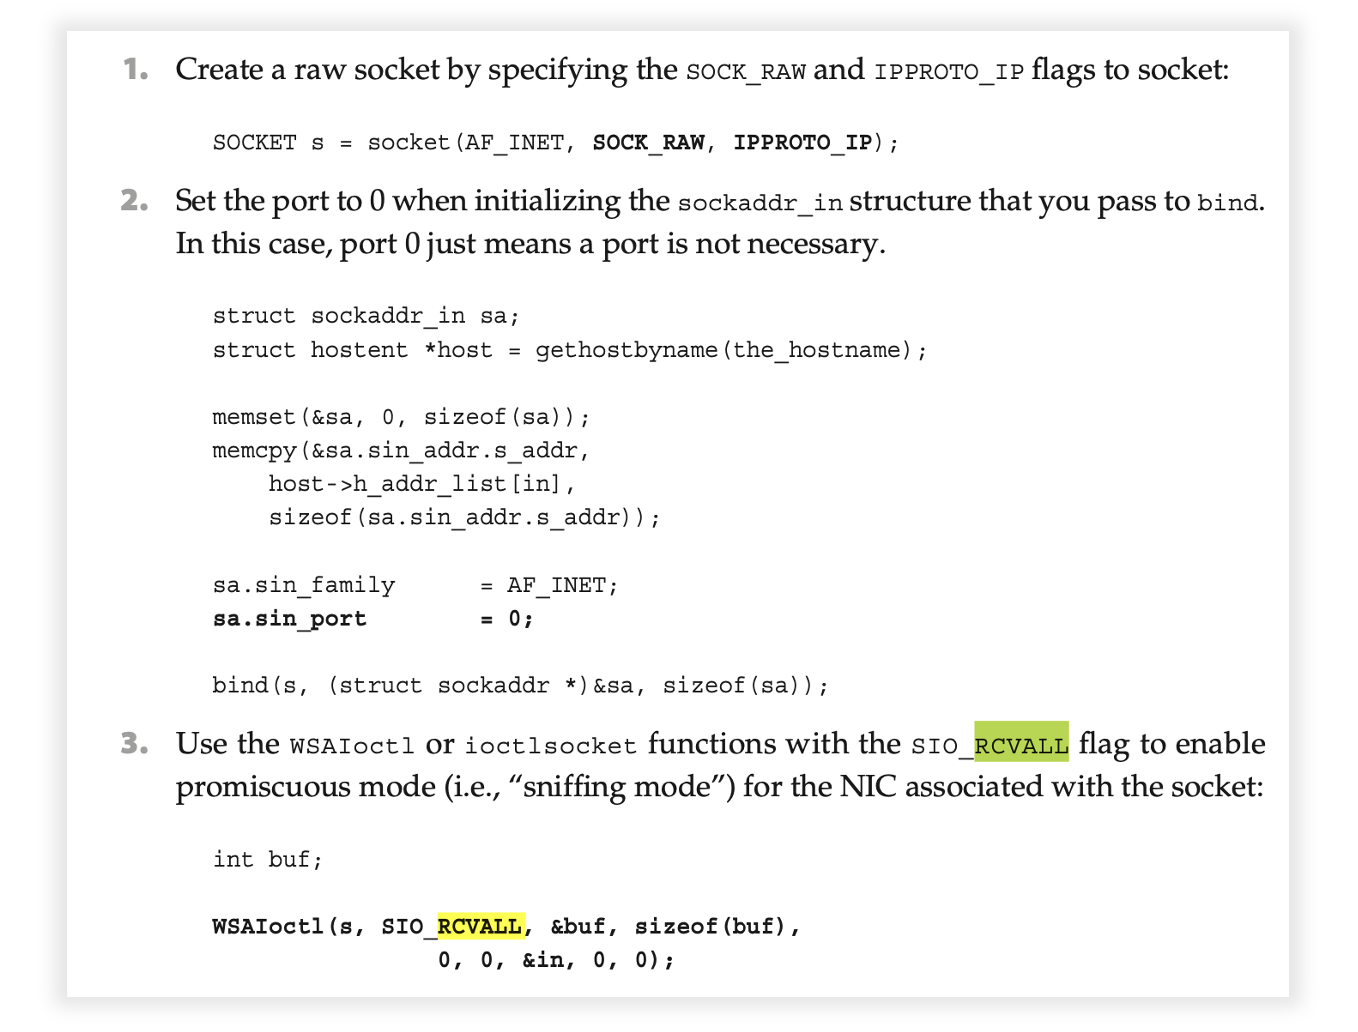
Once the code described above is executed, the calling application can then receive all packets that traverse the system. To send raw packets, applications only need to create a socket (as shown in step 1 above). This sample project from Microsoft illustrates how to send and receive raw ICMP packets in an application.

Detecting Raw Sockets Before Windows 10

Given the danger posed by raw sockets, it is important that DFIR methodologies can be used to detect their use.  Before Windows 10, it was possible to detect raw sockets using memory forensics by looking for process handles open to the “\Device\RawIp\0” device, as well as looking for sockets with a local port of “0” and protocol of “0” (HOPOPT/RAW).

The following shows how Volatility is used to find handles to the “rawip” device in a memory sample infected with the Ursnif malware:

As seen, two processes were found to have this handle open: PID 4, which is the kernel, and PID 1824.

Running the sockets plugin and searching for raw sockets also leads us to PID 1824:

In a real investigation, we could then begin to inspect this oddly named process:

Detecting Raw Sockets in Windows 10+

Due to significant changes made by Microsoft to the Windows network stack, the above methods for detecting raw sockets are no longer viable on modern versions of Windows. This led us to begin a new research project to determine how raw sockets could again be detected.

To avoid relying on indirect artifacts, such as opened handles, our main goal was to determine which data structure within the network stack was now being used to track raw sockets, since the regular socket structure seemingly did not. Analysis of the network stack requires careful and time-consuming reverse engineering, as the debug symbols for network stack driver, tcpip.sys, only provide symbol names and no types. Furthermore, Microsoft now makes significant updates to tcpip.sys between versions, so it is not always the case that previous knowledge applies directly to the latest release.

Given our team’s experience in analyzing the Windows 10+ network stack, we were pretty confident that raw sockets would now be created using their own endpoint structure, similar to how the operating system is handling TCP sockets, UDP sockets, and connections. This led us to search for related functions in IDA Pro, which brought us to RawCreateEndpoint. Analysis of this function showed that it did create a new pool allocation for raw sockets, and that the socket references its owning process. Unfortunately, we did not see where raw sockets still track their create time as other socket types still do.

The following screenshot shows the main part of this function:

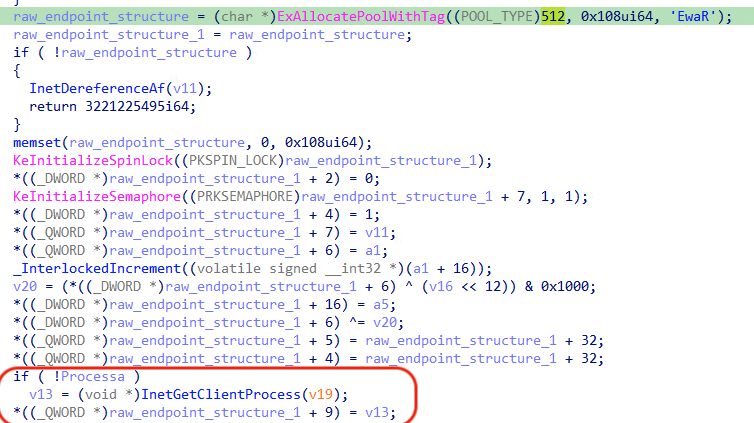
In the first line, an allocation of size “0x108” is created with a pool tag is “RawE” (after little endian conversion). The final part of the decompilation shows a reference to the owning process being acquired, which is then followed by it being placed at offset “72” within the allocated structure.

Note: We calculated the offset of the process reference as decimal “72” as the _QWORD pointer (8 bytes) times the addition operand (9) equals 72.

Developing a Raw Socket Recovery Plugin

With the information from the above decompilation, we could now develop a relatively simple Volatility 3 plugin to detect raw sockets within Windows 10+ memory samples. The first step of the plugin needed to find raw socket structures. As previously mentioned, our binary analysis showed that raw sockets are allocated within the kernel pool using a tag of “RawE”. Given the importance of pool-based data structures to memory forensics, Volatility 3 has a robust pool-scanning API that only requires plugins to fill in a few pieces of information. The following screenshot shows the few lines of code needed to enable Volatility 3 to find all instances of raw sockets:

In the above code, we are creating a pool-scanner constraint that requests scanning for pool allocations that meet the following conditions:

  • An allocation tag of “RawE” (line 2)
  • At least “0x50” bytes (line 4)
  • In either free memory or non-paged memory (line 5)

For each pool allocation that meets the above specification, Volatility 3 will create an instance of the object whose type name is given on line 3. In this case, we have specified “_RAW_ENDPOINT”, which is a type name our team created, as the network stack does not provide type definitions.

Since we created the _RAW_ENDPOINT type based on our binary analysis, we need to inform Volatility 3 of its definition. This is accomplished through formatting a JSON file that contains the name, members, offsets, and sizes for all structures and their members. The following screenshot shows how we added support for _RAW_ENDPOINT, including marking its owning process, the “Owner” member, at offset “72” as observed in IDA Pro.

Since we only need to define one type with a single member, our JSON definition is very simple. The rest of the JSON file metadata that Volatility 3 requires can be taken from existing JSON files within the repository.

With this new type installed, the pool-scanning code will automatically find instances of our specified pool objects, and then return to us instantiated _RAW_ENDPOINT structures. Our plugin then only needs to gather the process information followed by yielding it to the display function.

The code above is responsible for verifying that each found owning process is valid (lines 4-9) and then extracting the data of interest (process name and PID). The yield statement (lines 11-17) will lead to the following code being executed by default, which prints the data formatted correctly and with descriptive headers.

Testing Our New Plugin

With the help of Volatility core developer Austin Sellers, we created two Windows 10 64-bit memory samples to test our newly developed plugin. The first sample was created while the SIO_RCVALL code (shown in the screenshot from The Art of Memory Forensics) was active. This would prove that we could detect raw sockets being used to sniff the network. The following screenshot shows our plugin against this sample, and as you can see, our plugin correctly finds our proof-of-concept program and its PID of 640.

Our second memory sample was taken when a modified version of the Microsoft raw ICMP program was running twice, each in a different configuration. The following screenshot shows our plugin correctly locating both raw sockets and correctly mapping these sockets to their owning process:

Complete Version Support

Now that we had proven our plugin worked, the final task was to ensure it worked across all Windows 10+ versions and not just the one from our test VM. The two criteria on which our plugin currently relies are the pool tag being “RawE” and the process offset being “72”. If either of those changed between versions, our plugin would fail.

To verify our cross-version support, we had two choices:

  • Manually analyze RawCreateEndpoint across all the different versions
  • Develop an automated approach

The manual approach had several downsides, including being time consuming and requiring significant future effort as new versions of Windows are released. Automating the process was also not trivial, as finding the RawCreateEndpointoffset within a tcpip.sys version requires downloading and parsing the PDB file followed by intricate static analysis to ensure the pool tag is constant and the offset did not change.

In the end, Gus created an automated and powerful IDA Pro script to automatically locate and analyze RawCreateEndpoint, and then report the pool tag used for the allocation along with the offset where the process reference is stored. The following shows the output from his script across our test set of tcpip.sys versions:

The output from Gus’s script showed that the tag and offset remained constant across all versions, thus making our life as plugin developers much simpler than if the offset changed often (as can occur with other data structures within the network stack).

Wrap Up

In this blog post, we documented how we were able to add detection of raw sockets on Windows 10+ systems to Volatility 3. We hope you enjoyed this peek into the memory forensics R&D process! If you missed our previous posts, be sure to read our walkthrough of detecting Mimikatz’s skeleton key attack and hidden services on Windows 10+ systems.

If you would like to try developing your own Volatility 3 capabilities, please consider submitting to the Volatility Plugin contest, where you can win prizes and gain visibility for your work!

It was great to see many of our friends and community members in Vegas during Black Hat. We really enjoy meeting members of our community,  and we deeply appreciate the nearly two decades of support and friendship!

Tuesday, July 18, 2023

The 11th Annual Volatility Plugin Contest!

We are excited to announce that the 11th Annual Volatility Plugin Contest is now open! This is your chance to gain industry-wide visibility for your work, contribute to an important open-source project, and win a cash prize!

The 11th Annual #PluginContest is open!

Volatility Plugin Contest

The Volatility Plugin Contest is an excellent opportunity to put groundbreaking capabilities into the hands of investigators and contribute to the open source forensics community. Since its inception, the contest has encouraged research and development in the field of memory analysis. Participant contributions have come from all around the world, helping to build the next generation of memory forensics.  

Submissions for the 11th annual Volatility Plugin Contest will be accepted until December 31, 2023, and winners this year will receive over 6000 USD in cash prizes! 

Click here for full contest details.

If you are looking for inspiration, check out last year's Volatility Plugin Contest Results.

Monday, June 5, 2023

Malware and Memory Forensics Training Headed to Amsterdam in October 2023!


We are very excited to announce the next public offering of our Malware and Memory Forensics with Volatility training course! This fall, our course will be held in Amsterdam on Monday, October 2, through Friday, October 6. 

Course content was recently updated with a significant amount of new material to cover the latest acquisition and analysis techniques for Windows 10 and 11, as well as the latest versions of Linux and Apple Silicon devices. Please see our previous post for a more detailed list of updates.

We recently held the first run of the updated course in May, and we received extremely positive feedback, including the following:

Very technical and comprehensive course on Windows memory forensics. Would definitely recommend to those looking to understand both forensics and how malware can compromise the machine.
The class was very in-depth and I feel that I learned a ton about memory forensics and Volatility in just a week.

This course is a must for any seasoned or beginning forensics analyst looking to grow their investigative skills using memory forensics.

The CTF, which concludes the course, is often highly competitive and provides an opportunity to win limited-edition stickers, t-shirts, mugs, and other Volatility swag. In the May CTF, the winner was decided in the last few minutes!

Our team is currently working on even more updates for the October course, including more Windows 10 and 11 labs centered on the latest malware found in the wild, as well as in-depth Linux malware analysis. 

If you are interested in taking the course, please contact us. If you cannot make the Amsterdam offering, we also have our self-paced, online course available year round, as well as the ability to provide private training for organizations.

We would like to thank the community for their continued support of Volatility, including code contributions, tutorials, bug testing, and attending trainings. 

Our team will be in Vegas during Black Hat, Defcon, and BSides Las Vegas this summer, so please let us know if you would like to meet up.

-- The Volatility Team


Wednesday, March 22, 2023

Memory Forensics R&D Illustrated: Detecting Hidden Windows Services

As mentioned in a recent blog post, our team is once again offering in-person training, and we have substantially updated our course for this occasion. Over the next several weeks, we will be publishing a series of blog posts, offering a sneak peek at the types of analysis incorporated into the updated Malware & Memory Forensics training course.

Introduction

To begin the series, this post discusses a new detection technique for hidden services on Windows 7 through 11. Since not all readers will be familiar with hidden services and the danger they pose on live systems, we will start with some brief background. We will then walk through how services.exe stores service information, and how we can recover it in an orderly manner. This will lead to how we developed two new Volatility 3 plugins to help automate detection of hidden services.

The power of these plugins will be showcased against the powerful GhostEmperor APT rootkit that was discovered in the wild by researchers at Kaspersky. GhostEmperor employs a kernel mode rootkit and a userland DLL to maintain persistence and control the victim system. This DLL operates as a service that is hidden from live analysis and DFIR triage tools, and it interacts directly with the rootkit driver in kernel memory. As will be demonstrated, by automatically detecting the hidden service of GhostEmperor through memory analysis, we can quickly find the rest of its components, including those hidden on the live system.

Services Background

Services are a powerful feature of Windows that allow malware to run in one of three possible forms. The first allows malware to register a DLL that will be loaded into a shared svchost.exe process, hiding it amongst other DLLs loaded inside the same process, as well as the many svchost.exe instances that run on a normal system. The second form allows malware to run as its own process. The third, and most dangerous, form is when malware creates a service to load a kernel driver (rootkit).

When services are created and started using standard methods, a few artifacts are left behind for investigators to find. The first is a set of registry keys and values under CurrentControlSet\Services\<service name>. The second is the service’s entry within a linked list maintained by services.exe. This list is enumerated when system APIs, such as EnumServiceStatus{A,W,Ex}, and tools, such as sc.exe query, are used to enumerate services on the running system.

Given the power of services, malware often abuses the ability to create or hijack services for its own purposes. This leads to the inspection of services on a running system by endpoint detection and response solutions (EDRs) and threat hunting teams to look for any suspicious signs. To avoid detection while keeping a service active, malware has historically targeted both sources of artifacts—the registry keys and the services.exe list—with registry keys being targeted in two ways: deleting or hiding them.

In the first approach, malware will delete its registry keys while running, and then rewrite them before system shutdown or reboot. This has a major disadvantage though, as sudden system crashes or service stops prevent the malware from re-registering its persistence.

This deficiency led to the current approach malware takes, including by GhostEmperor, which is to simply hide its keys from the running system. The following screenshot shows Kaspersky’s report on the malware's approach:


As discussed in Kapersky's report, the CmRegisterCallback usage effectively allows the malware to hide its service’s keys from tools on the live system. Detecting this malicious callback is possible with Volatility’s callbacks plugin though, and there are also EDRs capable of enumerating callbacks from within kernel memory. To avoid these EDRs, some rootkits found during recent APT campaigns have implemented a completely new method of registry key hiding, known as GetCellRoutine hijacking, that we will cover in an upcoming post along with another new Volatility 3 plugin.

Beyond the registry, malware also wants to hide its malicious service from tools on the live system that query services.exe to enumerate running services. To accomplish this, malware will inject code into the services.exe process, and then unlink the malicious service of interest. This will effectively hide the service from live DFIR triage tools and built-in Windows commands. It's the detection of these unlinked services using new memory forensics capabilities that we cover further in this blog post.

Note: Chapter 12 in The Art of Memory Forensics is devoted to discussion of Windows services, ways malware abuses them, and several historical methods of detection. If you would like a complete treatment of the subject after reading this blog post, then we suggest reading this chapter.

Detecting Unlinked Services

As mentioned, a wide variety of malware samples will unlink their malicious services for anti-forensics purposes. The following screenshot from the Kaspersky report on GhostEmperor describes this for the malware sample:

In our analyzed memory sample, the name of the hidden service is “msdecode”, which is one of the possibilities listed in the report.

The Art of Memory Forensics details one method for detecting unlinked services with Volatility. This method relies on scanning physical memory for services records, and then drawing a dot graph of how each service is linked to other services. This linkage is based on the previous and next pointers of the doubly linked list. During normal operations, each service record should have one service’s forward pointer referencing it, and one service’s backwards pointer referencing it. In the case of an unlinked service, the hidden service will have no services that reference it. The following image from The Art of Memory Forensics shows how this detection logic is applied to an unlinked wscsvc service:

As can be seen, all services other than wscsvc have previous and next pointers (green and red arrows) pointing to them from other services. This is a direct visual indication that the wscsvc service is unlinked.

Unfortunately, this detection method is no longer viable for two main reasons. First, the Connected Devices Platform subsystem creates a wide variety of temporary services during system operations. This means that smear (changes to memory during acquisition) will often cause these services to appear as unlinked when using the method that detected wscsvc. The second reason is that scanning physical memory will find copies of service records relating to services that have since changed state (restarting, start<->stop). The ability to recover these historical records is a powerful aspect of memory forensics, but unfortunately clutters the results for this particular use case, as the historical records are no longer tracked by services.exe.

To illustrate these issues, we created a Volatility 3 plugin, svclinks, that reports a text-based version of the visual graph. We ran svclinks against our memory sample infected with GhostEmperor. This plugin reports only services that it thinks are unlinked, and the results are shown below:


As can be seen, while our target service, Msdecode, is in the reported list of unlinked services, so are several other services, all of which are false positives. Given the inability to rely on our old method, we needed to develop a new one.

Replicating services.exe's Enumeration of Services

Knowing that the live system uses the list inside of services.exe to report services, along with the fact that malware takes great effort to hide from this list, we chose to use it as a source for detecting unlinked services. This detection relies on cross-comparing the services found through scanning, which Volatility 3 already supports, versus the list walking performed in our new plugin. This is similar to using pslist and psscan (or psxview) to detect unlinked processes within the kernel.

Over the years, Microsoft has made substantial changes to the methods services.exe uses to track services, but, luckily for us, we only have to be concerned with changes in the data structure layout and the name of global variables. The following screenshots show how the services.exe database is declared across Windows versions:

Windows 10+:

Windows 7:


For data structure layouts, Volatility 3 already contained definitions for most of the types needed. All we had to add was the CServiceDatabase type and the offset to the first service record. Luckily, this was at a constant offset for all versions tested.

Enumerating the Service List in Volatility 3

To automate detection of unlinked services, two Volatility 3 plugins were developed. The first, svclist, locates and then enumerates the list of services maintained by services.exe. The second, svcdiff, compares the services obtained from scanning with the services obtained from walking the list. We will now discuss how these plugins are implemented with several screenshots of code. If you would like to read a nearly line-by-line breakdown of implementing a Volatility 3 plugin that performs similar actions, please see our post on detecting the skeleton key attack of Mimikatz.

Finding the Service Database

Obtaining the address of the service database inside of a particular memory sample is easy, since Volatility 3 supports automatic symbol resolution through PDB files. This tells us our plugin precisely where to find the database within the memory sample. 

To start this recovery, Volatility’s process enumeration API is used to find the _EPROCESS object for services.exe. Next, the following code is used to automatically download and parse the PDB file for the executable, and then search the variations of the service database's symbol name: 


The end result of this code is that the svclist plugin will automatically know where to find the services database, which then tells the plugin how to find the beginning of the list.

Enumerating Services from the List

Once the list is found, Volatility’s traverse API for services can be used to walk the list; svclist then has little work left to do, as the existing svcscan plugin already contains a get_record_tuple API that gathers the information about a service (name, path, PID, etc.) to report to the analyst:

Using this, the output from our plugin then looks the same as when svcscan runs.

Detecting Unlinked Services in Volatility 3

Our detection of unlinked services in the new svcdiff plugin is based on comparing the set of services generated by the svcscan plugin and our new svclist plugin. In particular, each of these plugins is programmatically run, and then the names of any service found through scanning—but not through list walking—is reported. 

By keying in on the name, we work around the issues found when linked-list pointers are used. This fix works because even if a service is stopped and restarted (which creates multiple data structures in memory), the name will be the same between runs. The name-based approach also removes the chance of false positives from the temporary services generated on Windows 10+. 

The following screenshot shows the core of this plugin and how easy it is to leverage existing APIs in Volatility 3 to produce powerful new capabilities:

In this code, the services_scan API is first used to gather the names of services based on scanning. As shown in the get_tuple_record screenshot, the name of the service is the sixth entry. Next, service_list from our new plugin is used to gather services like services.exe does on the live system. Finally, a simple set difference is used to determine names found from scanning that were not found in the list. These are then reported to the output rendering API.

Detecting Ghost Emperor

With our new plugin available, automatically detecting GhostEmperor’s unlinked service is as simple as one Volatility invocation:

In this invocation, svcdiff reports only one service, Msdecode, which we know is the one hidden by GhostEmperor. 

Exploring the Hidden Service

With this information in hand, we can investigate further by determining other components and actions of this service. To start, we can look at the list of DLLs inside of the process (reported as PID 4756 by svcdiff):


In this abbreviated output, we see DLLs inside of system32, as well as the msdecode.dll of the malware. By applying the --dump option to dlllist, the plugin will extract all of a processes DLLs to disk. Looking at the strings output of this extracted file shows the name of several APIs used for gathering sensitive system information and anti-forensics purposes:

The extracted DLL file can then be loaded into your reverse-engineeering (RE) tool of choice, scanned with YARA signatures, and other static analysis techniques.

Kernel Mode Components

After examining loaded DLLs, we can then examine the handles of the process to determine which system resources it is accessing. Since we know a kernel rootkit is involved, we search for any references to Device files within the handles output. Device files are created by drivers to allow userland processes to "speak" directly with the driver. This is the most commonly used interface by rootkits to allow the controlling process to specify filenames, registry keys, and processes to hide, as well as actions like enabling privilege escalation. 

Looking at the Device files being accessed by the Msdecode service process shows us an interesting entry to a device named dump_audio_codec0;  the other entries are present on all Windows systems:

Attempting to investigate dump_audio_code0 further instantly shows that it is malicious in nature. The following screenshot shows the output of the modules and driverscan plugins of Volatility 3 while searching for the driver:

As seen, the driver does not appear in modules output, which only happens when anti-forensics techniques are used. This is verified by the output of driverscan that shows the module's base address and size have both been set to "0". This is a common anti-forensics technique to hide a module on a live system and prevent its direct extraction from memory.

This technique is, in fact, so common that Volatility has a special-purpose plugin called drivermodule to detect discrepancies between module and driver data structures:

In this output, two modules are reported. The first, RAW, will trigger in all nearly all memory samples but, as seen in the first column, it is reported as a known exception. However, dump_audio_code0 is not, and as we verified multiple times already, this driver is definitely worthy of deep investigation. 

Between the usage of our new svclist plugin, along with the drivermodule plugin, we have directly detected both the userland and kernel components of the rootkit, and we have done so without any existing IOCs specific to GhostEmperor. As demonstrated, memory forensics continues to be a necessary component to accurately detect modern rootkits and malware.

Conclusion

In this blog post we have demonstrated a new memory-forensics technique to detect hidden services in a smear-resistant manner. Given the number of malware samples that hide services from the live system, as well as the danger posed by these services, it is essential that malware can be detected in a reliable manner. 

If you have any questions about this blog post, please let us know! You can email us, or find us on Mastodon and Twitter. We also have our own Slack Server
 If you enjoyed this content, then be sure to check out the announcement of our updated training class. During the course, students are taught how to detect modern malware, such as the sample discussed in this blog post, as well as gain significant hands-on experience through many real-world labs. 

Finally, we will be presenting new research on triaging modern Windows rootkits at BSidesCharm in Baltimore in a few weeks, so please come say hello if you will be there!


Friday, February 24, 2023

The 2022 Volatility Plugin Contest results are in!

Results from the 10th Annual Volatility Plugin Contest are in! There were 8 submissions this year, including submissions from 2 contestants from previous years who have continued to build on their previous work. Submissions included updates to graphical interfaces, plugins to detect Linux rootkits, plugins to extract threat actor activity despite anti-forensics techniques, and a new analytical capability for leveraging handle information to augment investigations. As usual, we would like to thank the participants for their hard work on their submissions and contributions to Volatility community!

Independent open source projects and communities only remain viable because of contributors who are willing to sacrifice their time and resources. Please show your appreciation for the contestants’ contributions by following them on Twitter/GitHub/LinkedIn, providing feedback on their ideas, and helping to improve their code with testing, documentation, or contributing patches. 

Monday, January 30, 2023

The Return of In-Person Volatility Malware and Memory Forensics Training!

We are excited to announce that we are resuming our in-person Malware and Memory Forensics with Volatility training course! From Fall 2012 until Spring 2020, this course ran multiple times a year and taught hundreds of students how to apply memory forensics to their incident response and malware analysis workflows. Since Spring 2020, the course has been delivered in a virtual, self-paced format. With the return of our in-person training, students now have the option of attending in-person delivery or the virtual version. 

The first in-person course of 2023 will take place May 8–12, 2023, in Reston, VA. We are also exploring potential venues for a Fall 2023 course in Europe.  Detailed course information, including registration procedure, format, and deliverables can be found on the course page

This course is taught by members of the Volatility Team and teaches students how to detect and respond to modern, advanced threats through comprehensive analysis of volatile memory and key file system artifacts. All material for this course is based on the instructors’ experience detecting and responding to some of the most sophisticated threat groups in the world (1,2,3,4,5). The knowledge and insight gained during these investigations has been transitioned into training content and labs.

Course Updates for 2023

The rapid advancement of malware and attacker toolkits, along with major changes by operating system vendors, means that incident response handlers must constantly update their skill sets and knowledge. The 2023 version of our course will include many of these changes in the form of updated lectures and new labs. These updates will be delivered in person, as well as incorporated into the virtual course.

 These updated topics include the following:

  • Significant artifact changes in later versions of Windows 10 and Windows 11
  • New Windows rootkit techniques that bypass driver signing enforcement and PatchGuard monitoring
  • Modern credential dumping attacks
  • Modern code injection techniques meant to bypass EDR and AV monitoring
  • EBPF-based Linux rootkits (see our research from Black Hat 2021)
  • A deep dive into in-the-wild keylogging techniques (see our research from Black Hat 2022)
  • Memory analysis of Apple Silicon devices 

During the course, we will also be showing off many new features and plugins of Volatility 3 so students can see the latest updates to the framework.

If you would like to receive updates on the course and general Volatility developments, please join our Slack server; follow us on Twitter and Mastodon; and join our mailing list.

Our team is really looking forward delivering in-person trainings again, and we hope to see many of you in Reston in May!

-- The Volatility Team

Tuesday, July 5, 2022

The 10th Annual Volatility Plugin Contest!

This year not only marks 15 years since the first public release of Volatility, we are also excited to announce the 10th annual Volatility Plugin Contest is now open! Submissions will be accepted until December 31, 2022.

Volatility Plugin Contest

The 2022 Volatility Plugin Contest is your chance to get industry-wide visibility for your work, put groundbreaking capabilities into the hands of investigators, and contribute back to the open source forensics community. Since its inception, the contest has encouraged research and development in the field of memory analysis. Over the last 10 years, participant contributions from all around the world have helped to lay the foundation for the next generation of memory forensics.  

Winners this year will receive over 6000 USD in cash prizes! 

Get visibility for your work, contribute to an important open-source project, and get a chance to win a cash prize! For more information, see the full details here: 2022 Volatility Plugin Contest  

If you are looking for inspiration, check out the 2021 Volatility Plugin Contest Results.

Acknowledgements


We would like to thank Volexity and our other sustaining donors for their continued support.